When you are working from home or a small office a lot of times you need to be the IT support person. In this article I'm going to discuss the hard drive recovery process I followed to repair my desktop computer.
First I will discuss the hard drive tests I followed to determine it was dead. Then I will discuss the steps I followed to replace the internal hard drive. This will be helpful if you are investigating a similar issue or trying to decide if you feel comfortable making the same repair to your computer.
Then I will discuss how I installed the Windows 7 operating system and then upgraded to Windows 10. This works if your computer was a previous OS before Windows 10 and then you upgraded to Windows 10. From what I know, Windows 10 knows what computer it was installed on. So if you are using the same motherboard you don't need to re-enter the license keys. Pretty cool!
Hard Drive Tests to Determine if it's Dead
A couple of weeks before Christmas I went to start my computer in the morning and it didn't start. My computer screen presented the error message below:
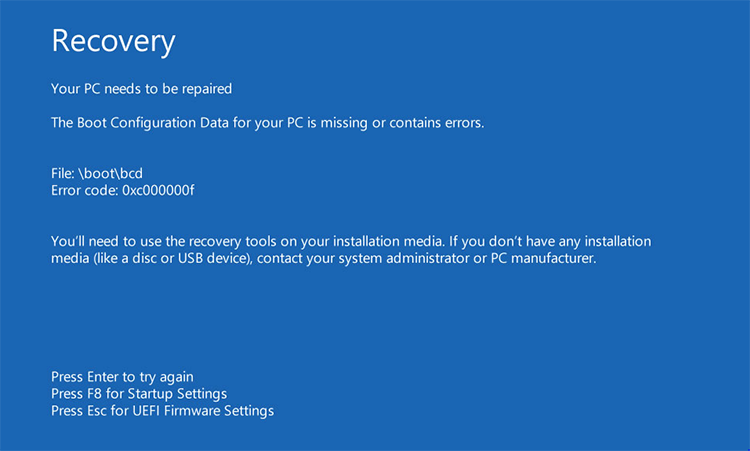

In hopes it was a minor hiccup, I restarted my computer and got the same message. From my experience, restarting your computer will solve a lot of problems, but not this one. On a second computer, I did some research online and it recommended restarting the computer and eventually it would start in the Window Recovery Environment.
Eventually, this worked and I got the following window:
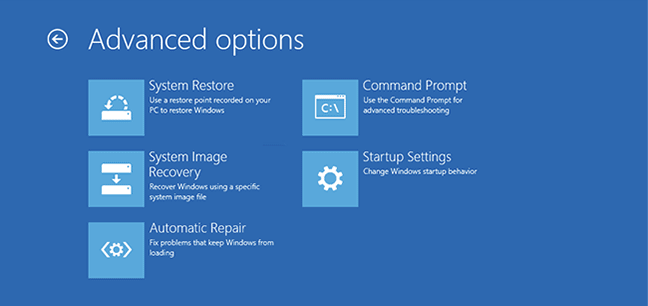

I didn't have a Restore Point – not very good – Strike 1.
I thought I had a System Image for recovery on a CD, but I couldn't find it – Strike 2.
So I moved onto the Automatic Repair.The automatic repair did something, but the next message I saw was “No Hard Drive Found!” – Strike 3.
After more investigation and thinking about this problem, I decided the hard drive was dead. But before I gave up and moved to the full hard drive recovery process, I decided to open the computer and see if there was a cable issue. From a previous job installing wireless data networks, 90% of issues are related to cabling problems: loose cable, broken cable, wrong pin-out, etc. I was thinking that maybe the cable came loose or some other obvious issue. But not this time, the cabling all look good.
Here's a nice resource I found while writing this article on common errors and the steps to follow for the hard drive recovery process: PC repairs and fixes.
Decision to Get Professional Help
I was pretty sure I needed a new hard drive, but thought it would be a good idea to get a professional opinion. I packed up my computer and headed to my favorite local computer shop to get their opinion. Before I disconnected all the cables from the back of my computer, I snapped a photo with my smart phone.
A photo of the cable connections is great idea to save time when reconnecting all the cables to your computer. At the time of removing the cables you don't think about it or think I can remember. But when you go to reconnect the cables there's a few connectors that look the same.
If you don't have a digital camera or smart phone handy, you can also draw a diagram of the cable connections. A drawing takes a bit more time than taking a photo, but it will save you time when you reassemble your computer.
On my drive to the computer shop I decided that if the drive was dead, I would get them to do the repair. I figured a new drive wouldn't cost very much and they could play with installing the new drive and re-installing the OS. And besides, it was close to Christmas and I had other stuff to do.
I was also thinking it would be good to get an SSD (Solid State Drive) hard drive for the operating system and a standard hard drive for the data. SSD drives are very fast but expensive. Unless you have lots of money, best to get a smaller SSD drive to run your operating system and a standard drive for your data. This is also handy if the drive running your operating system dies, you still have all your data on the second drive.
At the Computer Shop
Talking to the sales representative he mentioned that they are very busy and he would get the tech out to have a look. Ah right, it was close to Christmas, I'm sure they were building new computers for Santa. Expecting their tech was going to connect to my desktop on the spot and run his diagnostics I was pretty impressed that they would take the time to do this when they were so busy.
When he came out from the back room, we reviewed the hard drive tests I had and he was pretty confident that the issue was a dead hard drive too. No hooking up my computer for run diagnostics on the spot, but I trusted his opinion. Of course there was always a chance it was something else
After a bit more discussion on the hard drive failure and how busy they were, he mentioned it was going to take 3 to 5 business days before he was going to be able to look at and then take a day to install the hard drive and operating system. At this point I realized he was suggesting it will be a lot quicker if I got a new hard drive recovery and installed it myself.
My plans of not getting my hands dirty to resolve this issue was quickly disappearing. When I agreed to self medicate this issue he was quick to say “sell him a 1 terabyte hard drive” and disappeared to the back room. My computer was over 5 years old an probably not worth investing too much money.
For $70 I was going to revive my computer with my own hands. Pretty cool! And I decided the SSD drive would have to wait for a future machine.
With my new drive and optimism I headed back to my home office to revive my computer.
Time for the Hard Drive Recovery Process
If you skipped the first part of this article and just going straight to the hard drive recovery phase, I recommend you take a photo or make a drawing of the cable connections to your desktop computer. This will make it a lot quicker to properly reconnect the cables to your computer. And if you haven't already, disconnect the power cable from your computer.
Then put your computer on a desk or other hard surface where you can easily work on it.
The next step is to remove the side panel of your computer to access the motherboard. Each computer is different and if it's not obvious or you've never done this before go to the website for manufacture of your computer case.
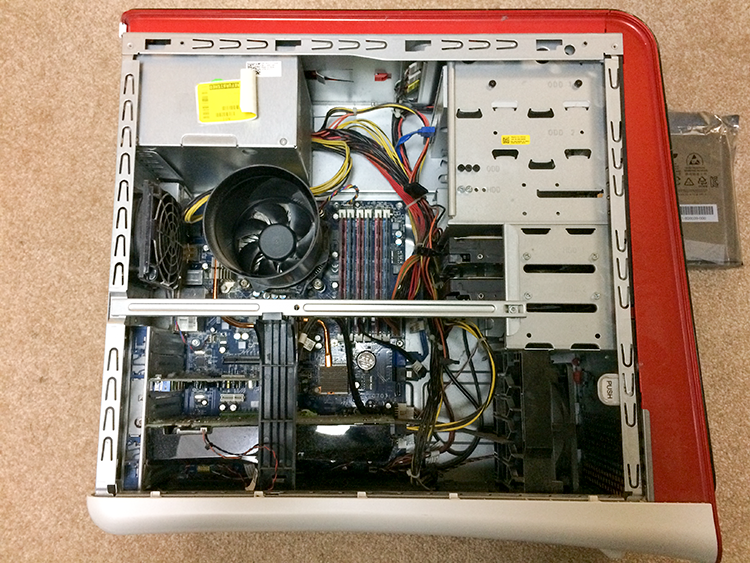

Feeling like a heart surgeon I opened my desktop and prepared to operate and replace the hard drive. First thing I noticed inside the computer case is all the dust bunnies. Being a bit of a neat freak I decided I might as well clean the inside of my computer. So out comes the vacuum for a quick clean up. My vacuum has a plastic attachment and I like to use this so the metal of the vacuum does not come in contact with the motherboard or case.
Before removing the cables on the installed hard drive, I had a quick look at which cables were connected to it and where. There's usually two cables connecting to a hard drive: power and data. You can't mix these up, but most computers have spare cables inside and hard drives can have multiple connectors. So good to have a quick look and know how it is presently connected. Can't hurt to take another photo.
Mount the new hard drive in to the new case. You want to make sure you take the time and do this properly. If the hard drive is not attached it will move around if the case vibrates or it can move if the case is bumped. I recently helped a friend and he didn't attach the hard drive to the case and when I picked up the computer the hard drive fell out and hit the concrete floor. Luckily the hard drive was not damaged, but it was embarrassing and could have been costly.
If you are looking for detailed steps to install your new hard drive, please check out this article on PC World: install new internal hard drive.
Time to Start the Computer
With the new hard drive installed it was time to put it all back together. I like to make sure everything is running before I put the side cover back on the computer. Just in case there are any issues or I need to see what is going on inside.
Time to connect all the cables, hopefully you have a photo or drawing. I like to connect up the AC power cable last. This just makes sure everything else is connected before power is applied. I also like to screw down any of the cables that you can. It's easy for a cable to get bumped or slowly disconnect from the computer. And this can take a long time to figure out and fix.
I turned on my computer and it came to life. The hard drive recovery process was a success! Next up installing the operating system.
Installing the Windows Operating System on my New Hard Drive
I was running Windows 10 on my computer but I didn't have the CDROM. This is because the computer was shipped with Windows 7 and I upgraded to Windows 10 with the free upgrade. So the steps below explain how to upgrade to Windows 7 and then Windows 10.
Steps to install Windows 7 OS
Here's the steps I followed to install Windows 7 on my computer:
- Start the computer
- Insert Windows 7 CD-ROM
- Restart the computer
- Follow the steps to install the operating system
If you are looking for more detailed steps, please read this Microsoft post: how to install windows 7 full version on a new hard disk.
Upgrading to Windows 10 OS
Next I upgraded my computer to Windows 10. Since I previously installed Windows 10 on my computer this was a straight forward upgrade. My understanding is that this works if you and you are reinstalling on the same hard drive or a new one as long as it is on the same computer.
I upgraded my computer to Windows 10 when the free upgrade was available. I checked and this is no longer available, but like I mentioned earlier, if you had Windows 10 installed on your computer it will remember and you can upgrade your computer to Windows 10. I didn't have to enter my license key for Windows 7 or Windows 10. I expect Microsoft is collecting a piece of information from my motherboard.
Final Notes on my Hard Drive Recovery Process:
In the end it was easier to install the new hard drive and operating system than I thought. If you originally installed Windows 10, you can skip my step to install Windows 7. This is the step I followed and thought it was useful to explain the entire process.